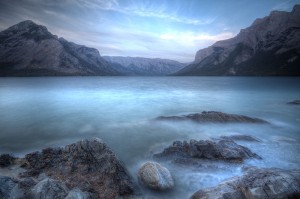
10 Second exposure of waves lapping the shore at Lake Minnewanka, Canada with a DSLR and some darkening filters.
Novice as well as professional photographers can have a lot of fun with changing the shutter speed of their camera. Playing with length of time the shutter is open when taking a photograph can lead to very interesting photographs. Most people are familiar with the “slow water” shots where streams and rivers take on a silky look and provide an almost ethereal feeling. But slow water is just the beginning. There is a lot more that slow shutter speeds can do to help a photographer create that unique piece of art and here’s how to do it.
The exposure triangle of photography is aperture, sensitivity, and time. While talk of “f numbers” for aperture and “ISO settings” for sensitivity can be sometimes difficult to understand, the one thing that is generally easy to understand is time or shutter speed. While all three of these are important for good exposure there are a few things that you can change on your camera to really help you when trying to take a photo with a long shutter speed. The first thing you will need is a tripod. While you may end up with some interesting designs from hand holding, a tripod ensures the items in your photograph that you don’t want to move are forever fixed in time when you snap the shutter. There are several other tools you can have to assist in this, but the most important for the type of photograph I will describe is the tripod.
Next you will need to decide what you want to take a picture of… a stream using the slow water technique, a busy highway at dusk to get car light trails, waves crashing on the beach, or even writing your name in the dark in front of you camera. Once you have decided set up your tripod and attach your camera to it. I recommend focusing your camera on something solid in your photograph about a third of the way into your scene. This will give your picture something for you and your viewers to see and understand when looking at your photograph. Now it’s time to alter your cameras settings to get a long exposure. This will differ depending on the type of camera you have.

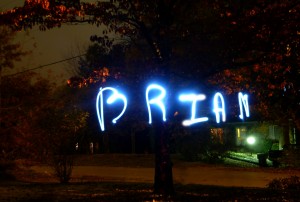
Here you can see how I wrote my name using the “starry night” feature using my wife’s point and shoot camera.
Most of the small point and shoot (P&S) cameras aren’t the best for taking slow pictures but it can be done. With a P&S camera there are several things you can try based on the model you have. For instance my wife’s point and shoot has a “starry sky” option that will keep the shutter open for 15, 30, or 60 seconds but in order to use the option it has to be a dark scene or appear dark to the camera. This setting might be good for writing your name or spelling out a message to your loved one with a flash light while shooting at night, or photographing the Milky Way. If you have more manual controls on your point and shoot set it for the lowest sensitivity, usually around ISO 100, turn off the flash, turn off image stabilization (when on a tripod image stabilization can cause blur), and put it on timer. If you can set the length of time the shutter can be open, start with a value around a second and go from there. If your camera can adjust the aperture enough to get a correct exposure then keep adding time. Once your pictures start to look washed out you won’t be able to go any longer on the length of time the shutter can be open, without additional aids.
Many people might ask why I said turn on the timer, this allows you to push the shutter button on the camera and for any vibration from you touching the camera to stop before it trips the shutter. If you’re still not getting the blur you desire in the moving portions of your picture try putting a dark piece of glass in front of the camera so there is less light entering the lens (something like your sun glasses). Putting a dark transparent element in front of the lens makes the camera think it needs to collect more light and will leave the sensor collecting light for a longer period of time than it would need without it. The darker the glass or transparent plastic, the longer the exposure time you will have. Basically your fooling the camera into thinking it is nighttime even if it is the middle of the day.
If you have a high-end point and shoot or a DSLR (digital single lens reflex) camera it will be much easier to set your camera for long shutter speeds. Most of these types of cameras will go up to 30 seconds on shutter speed and generally have a bulb mode (B on the switch). Bulb mode will give you almost an infinite length of time for your shutter speed, generally till the battery dies, though you generally won’t have the shutter open that long. Bulb is great for shooting star trails and other very really dark scenes. For the most part 30 seconds is enough for most people. There are two ways you can set this up, one is super easy and you’re almost guaranteed a correct exposure. This easy way is to set your camera on Aperture priority or “Av” and then set the aperture at its highest f number, say f22 or f36. The camera will set the shutter speed accordingly up to 30 seconds. As stated above, to maximize the time the shutter is open you need to use the lowest ISO your camera will go. I use this method myself, though it can be just as easy setting it up this next way. Set your camera to “Tv” or “S” for time value or shutter. Set the length of time you want the shutter to be open and the camera will pick the appropriate aperture until it reaches your lens lowest or highest f stop.
If you see blinking numbers when setting this up you have surpassed the maximum value the camera believes will allow for a correct exposure. Try reducing the shutter time in “Tv” mode or adjust the f stop number in “Av” mode.
While some of this sounds fairly technical it’s not hard to remember. The basic steps are to turn the sensitivity to its lowest point, set the time for its highest point and let the camera adjust the aperture for appropriate exposure OR set the aperture at its highest and let the camera set the length of time. Once you get this small technical aspect out of the way you can play with your settings to achieve your creative vision. Happy shooting.
Manfrotto Tripods – Some medium priced better quality tripods
Cokin Filters – Inexpensive Filters and holder kits you can use to help get longer exposure times.
Lee Big Stopper – A rather pricey 10-Stop filter, but it helps you create some nice images.
Brian resides in Cookeville, TN. He has lived in the Upper Cumberland area for over 28 years and has been a photography enthusiast since 2004. Brian is an active member of the Cookeville Camera Club, the Photographic Society of Chattanooga and the Southern Appalachian Nature Photographers.